
This tutorial will guide you through each step in the process of growing your first cannabis plant(s) indoors. From seeds and nutrients to lighting and hydroponic systems, this guide is the ultimate resource for novice indoor growing.
Seeds
For your first grow operation I recommend seeds that are easy to get, such as those found in your own bud. Once you get some experience indoor growing you may want to consider buying cannabis seeds from seed banks. There are many types of marijuana seeds out there and many different strains. Feminized seeds yield only female plants, and low-rider dwarf plants seeds that flower automatically. There are many varieties of Sativa, Indica, and hybrid (containing genetics from both Indica and Sativa strains). Sativa and sativa-dominant strains tend to give the user more of a “head high” as opposed to a “body high”; where Indica-dominant strains tend to give you that couch-lock stoney high.
Growing Method
There are many methods of indoor growing but we will only talk about using soil here, as this is a beginners tutorial. Hydroponic growing will be a topic of a future tutorial. Soil provides the most natural flavor for cannabis and is best for cooking.
Germinate Seeds
It is extremely helpful to germinate the seeds before starting an indoor soil grow operation. To germinate the seeds, simply place them in a folded dampened paper towel and leave over night. Check the seeds, if the sprout has begun to break through the husk of the seed then it is ready. If not, re-dampen the paper towel and continue this process until the seed germinates. If the sprout does not break through within five or so days, it is most likely a dud. Toss, and start again.
Prepare the Space
You will need a space to grow your plants. Where ever you choose to grow, make sure you prepare the space properly. I suggest lining the floor with trash bags or plastic drop sheets to prevent water damage. It is also a good idea to line or paint the walls with a white material. This will help reflect light back at the plants. If this is not an option you may use aluminum foil. Make sure the dull side of the foil is facing outwards towards the plants. Aluminum foil is not a great choice however it is better than nothing.
Choose and Install a Light
Stay away from fluorescent light bulbs, but if you must always use a CFL (compact fluorescent light) and at least 100 watts for one plant. Your plant will most likely grow, however you will also likely be disappointed in your crops. We suggest using between 250-400 Watt HPS (High Pressure sodium) or HID MH (high-intensity discharge metal halide) lights. You will want to mount the lights in a way that allows you to move them up as the plant grows. For safety we suggest using a reflector on the light, and a fan in the space you are using for your indoor growing. Not only will the fan prevent it from getting to warm in the space it will also help to circulate oxygen to the plants.
Setting up the Plants for Indoor Growing
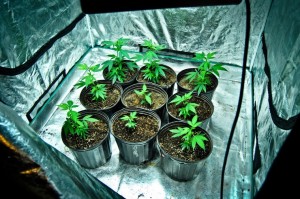 For each plant you are growing you will need one 3-5 gallon bucket. You can find these at Home Depot or almost any department store. You could also find a great deal at amazon.com. Make sure you poke about 5 small holes in the bottom of the bucket to allow excess water to drain. You may use the lid of the bucket as a water catcher by placing it underneath the bucket.
Next, fill each bucket with soil, leaving about 4 inches at the top. We suggest using organic potting soil. Test the soils PH using a PH Meter. The soil should be somewhere between 6.0 and 7.0. Remember adding nutrients will increase the acidity of the soil. There are PH balancing kits available to help achieve the perfect balance. This is important for a healthy plant.
Using your finger, push a small hole about quarter to a half-inch deep into the soil in the center of the bucket. Know place the seed or clone in and cover with soil. The soil should be packed firmly but not so dense that the sprout will not be able to push through.
The Light Routine
We recommend using 16 hours of light and 8 hours of dark for the first two weeks. After the first two weeks you may increase the amount of light by one hour each day until you are using between 18 and 24 hours of light in a 24 hour period. After the plants reach desired height (probably around 12” depending on the strain) you may decrease the lighting to just 12 hours on and 12 hours off. This will trigger the flowering cycle of the plant. This is the time the buds will begin to form. This is also the time where you must remove any male plants. Male plants are detected by their pollen sacs. These are small pod-like plant structures which will fertilize the female plants (causing seeds and less potency!). So be sure to remove the male plants as soon as you can spot them.
The Nutrient Routine
For the first two weeks after germination we suggest using only water to feed the plants. For the next two weeks slowly increase the nutrient solution to the suggested amount. This will help prevent against “burning” or “shocking” the plants. During the vegetative stage we suggest using N-P-K (nitrogen, phosphorus, potassium) ratio of about 30-15-15. For the flowering stage use a 15-30-30 ratio. This is only what we recommend, and every strain will do better using a different regiment. If you bought your seeds from a legitimate source it may come with documentation with a N-P-K suggestion.
Harvesting
Harvesting is a huge topic that involves many things including drying, curing, trimming and more. Here we will only get into knowing when to harvest. Check out our tutorial on how to harvest weed for a more in-depth tutorial. You will want to harvest the cannabis plants when the trichomes (small hair-like glands found on the marijuana buds) are an amber color. Use a magnifying glass to check the buds. When around 50% of the trichomes are amber in color, it is time to harvest!
Do you want to see what our favorite indoor grow equipment is? Never worry about getting the wrong thing, or worse forgetting an essential item until its too late, and hurting your plants. Check out this list of essential grow equipment and get ready to grow the best indoor weed of your life!
Final Thoughts on Growing Weed
As you can see, there is a lot that goes into growing weed. But, if you’re patient and do your research, you will be able to grow some amazing pot plants. If you want to learn more about growing weed, check out our other blog posts here.


1 Comment
Nice site!! Great info!